Eggs-cellent! (I know..lame..but I laughed!!!)

As I’m sure you know, eggs are a HUGE part of a Paleo Diet. They are a staple in my house, & I probably eat them in some form every single day. I know you’re probably saying, OH EM GEE ALL THAT CHOLESTEROL, or all of that SATURATED FAT!? Yeh, they have cholesterol & yeh they have saturated fat, but those are NOT the bad guys!!Β  Eggs are also FULL of protein & nutrients. Not to mention you get all of those awesome components at such a low cost!!!! You can’t beat it! It is not uncommon that my house goes through at least 2 1/2 dozen! Cook them in some olive or coconut oil,Β  I eat them for breakfast, snacks, dinner, bake with them, WHATEVER! πŸ™‚ My recommendation is to stick with Organic, Omega 3 enriched eggs, if you can. For Doug, he can eat 3 eggs every morning, no problem…for me….I get a little bored & I like variety! (I’m sure you picked that up about me by now!) Then, I get stuck! What do I eattttttt??! Nothing to haveeeeeee?!!? My life is over….WAH! (alittle dramatic?) So I wanted to compile a group of delicious egg variations for whoever gets bored with plain ole eggs sometimes πŸ™‚ So eat up your eggs,Β  you’ll thank me!!

collage

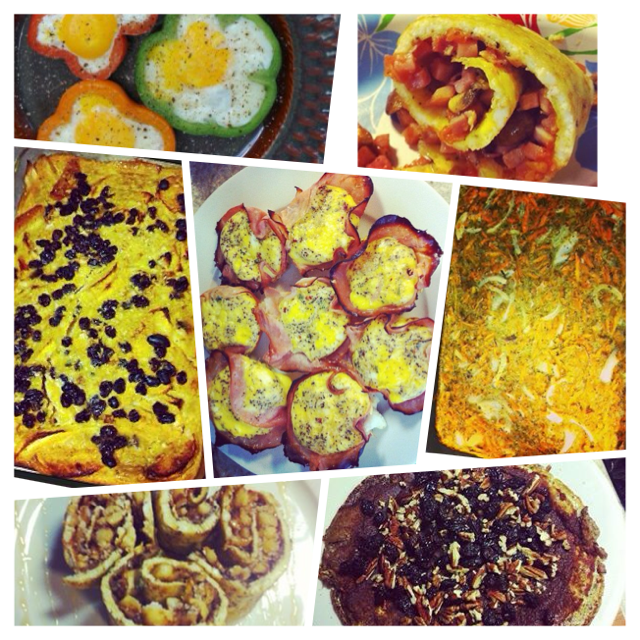
**Recipes below: starting from the top & going by rows we haveeeeee…

*Pepper Flowers: Slice peppers thin into little flowers (so cute), put them in a hot pan with a little evoo, let them cook for a minute or so, crack an egg right into the pepper, salt & pepp, flip when cooked & you are good to go!

*Ham & Salsa Roll-up: Whisk 3 eggs in a bowl with some salt & pepp, pour into a small pan, med-high heat, let cook almost all the way through (kinda like an omelette), flip carefully & cook the other side for a minute. Let cool for just a minute. Put on cutting board or plate, add your fixings (i used ham & salsa) Then roll up & eat like a burrito or cut into pieces! Enjoy!

MY ULTIMATE FAVORITE……

*Apple Pumpkin Bake: This is my all time favorite. I make it all the time. Paige says it tastes like pumpkin pie!!!!!! Who doesn’t like pumpkin pie for breakfast?!? πŸ˜‰

5 apples, peeled, cored, chopped

12 large eggs

14oz can pumpkin (not pie mix)

14 oz can full fat coconut milk

1/4 cup honey (optional)

2 tsp vanilla

1 tsp cinnamon

1/4 tsp salt

1/4-1/2 cup sliced almonds

1/4-1/2 cup unsweetened shredded coconut

1/4-1/2 cup raisins

Preheat oven to 425. Grease a 9×13 glass baking dish. Put chopped apples into bottom. Mix all ingredients BESIDES almonds, coconut & raisins. Pour liquid over apples. Top with almonds, raisins & coconut. Bake uncovered about 45 mins. (Wait til you see how gorgeous it cooks & rises!)

*Ham & Egg Cups: Excellent for on the go! I use either Boar’s Head or Applegate sliced ham. Grease your muffin tin, line with a piece of ham. Push it into the cup. Then mix up about 10-12 eggs, with whatever seasonings you would like! Fill up ham cups, not overfill, then put in a 350 preheated oven. Bake about 10 mins until cooked all the way through! Pop out & enjoy!

*Veggie Fritatta: Super Easy! I use this as an opportunity to use everything I have left in the fridge!! Preheat oven to 400, whisk up about 12-15 eggs. Grease a 9×13 glass baking dish. Add whatever veggies & seasoning to your eggs! I like to julienne some carrots, zucchini or sweet potatoes because they look snazzy like that! πŸ˜‰ Add some spinach or kale, salt & pepp, always onions! Bake for about 35-40 minutes until set. You are good to go! You can even serve with salad for dinner! EASY!

Last but not least……..

*Fruit & Nut Roll-up: Heat a small pan over med-high heat. Whisk 3 eggs, with a splash of unsweetened almond milk, 1 tsp vanilla, and a sprinkle of cinnamon. Pour into hot pan, cook until almost cooked fully, then flip & do that same until the eggs are cooked. Put onto cuttingΒ  board, let cool for a minute, I spread it with apple butter, then layered with 2-3 tbsp finely diced apples, pecans & raisins! Roll up & cut into thick slices! SO GOOD! I then drizzled a little honey & another sprinkle of cinnamon (just to make it picture worthy ;))

Your eggs will never be the same!!!! Let me know what you think!!

DIY Solid Lotion Bars

download11

So, in my profession (hair stylist) & in the winter, my hands are SUPER dry…I’d use regular lotion & it just wasn’t doing the trick! Plus, it’s made up of all sorts of crazy ingredients. I just wanted something easy to take along with me, something ultra moisturizing & healing, safe for my fragile hands & ALL NATURAL, with no artificial fragrances. I also wanted something that I could make myself =) These are the savior to my dry, sensitive hands!!!

DIY Solid Lotion Bars: (do not confuse these with SOAP, this is lotion, in a SOLID BAR FORM)

1 part beeswax (i used white pellets, yellow will work though!)
1 part coconut oil
1 part sweet almond oil (or other carrier oil of your choice)
essential oil of your choice: 25-50 drops (vanilla, peppermint, lavender, orange, etc)
Tray/mold of your choice! (amazon has a million, or Michaels)

*1 part = 1 cup (in this case!) **Use shea or cocoa butter in your recipe as well if you want to get snazzy (about 1/2 cup would be plenty!)

lotion bars download10

Normally in recipes you see the use of a double boiler & such. I don’t know why, but I always feel like that is hard work! Here is what I did. Mix everything in a bowl… & microwave!!! I heated it in 1 min increments as not to overheat. Stir at each minute. When fully melted & combined (you have to move quickly) Pour into your mold, & carefully put flat in the refrigerator. Let harden at least overnight. Pop out of mold & start moisturizing! It seems to be greasy at first, but I had no problem with it absorbing. You have to rub it between your palms for a moment to heat up & then use away! Excellent for on the go, just make sure you get a little tin to carry it in, otherwise you may have some meltage issues! These make perfect gifts as well! Store extras in the refrigerator to prevent from melting. **Especially good for dry knees, elbows, hands & feet! =)

Happy Moisturizing!!! πŸ™‚


Ohmmmm!

b9c20735751d748e2c90aaa958a865c1 2fd3159283eb6442b8c9f4e05897862d

Ok…so I went to an awesome hot yoga class this morning. What an intense 90 minutes! I’ve tried all sorts of different yoga classes, this one so far has the rest beat! It’s this little studio in Clinton, Pradipika. Amazing. So anyway, my workouts normally include lifting heavy weights, doing a lot of strenuous movements, doing things as hard & as fast as I can…which you’ll know as Crossfit. I love that! I have been wanting to find a happy balance though, between Crossfit & Yoga. This week especially, my body felt like it needed a good stretching! Yoga seems to be such a good change up, especially for a cross-fitter. You get your body nice & warm, and your muscles get such a good stretch! Not only that, it’s such a great time to clear your mind, empty your annoying thoughts & just focus on you for that hour or so! I’m telling you, you feel so good after, inspired!!!!!!!…especially after releasing all of those toxins & sweating like a pig! (No seriously, my shirt…SOAKED!) I guess you can’t help it in a room that’s about 100 degrees!! This is definitely something I am going to try to keep doing on the regular! **Be warned though….some people think yoga is just sitting around stretching…well don’t let me spoil it…I’ll just say this…it is not for the weak (physically or mentally) & be prepared to get killed!!!! You’ll see πŸ˜‰ Sometimes these yoga classes are harder than the WOD! ( I am NOT exaggerating!) So I am in no means a yoga pro, I have probably gone to like 15-20 classes…I do find the whole practice so interesting though! I just wanted to get a little more information on the subject! Enjoy & Try it out!!

Here are some benefits of practicing some hot yoga:

  • Flexibility (yeh…try putting your arms in a pretzel under your legs & balancing.. craziness!)
  • Strength (like holding all of your body weight on your arms?! You’ll have to see to understand!)
  • Cardio: your heart works the same way doing yoga in a heated room as it would running a mile! Did you know you can burn up to 1,000 calories in a 90 min class?!?! Nuts!!!!
  • Detox: All of that sweat has benefits!!! Releasing those toxins from the body & stretching out the muscles!
  • Focus: Sometimes it is very hard to focus on the position at hand, but from my research, I’ve heard that your focus on your movement can transfer into your daily life.. Focus! (I’ll have to see that for myself =))
  • Healing: Hot Yoga is also known to reduce symptoms of conditions and illnesses including diabetes, asthma, high blood pressure, depression, arthritis and obesity. WHAT?!?!?

**Found this info @ http://yoganonymous.com/eight-benefits-of-hot-yoga/

a790d5969fa506c8aeee9b831e9c21a2

Sunbutter!!

20140201-125921.jpg

If you live the Paleo dream, I’m almost positive you are missing peanut butter?? Well, this is what I’ve replaced my love for peanut butter with. Sunbutter! Now you can buy it in the store no problem, anywhere from $5-10. That’s no $2 for my darling peanut butter 😦 So of course I had to make it myself πŸ™‚ Sunflower seed butter is so simple to make & much tastier than the store bought version! Takes a food processor & a little bit of patience, but totally worth it! Here we go!!

Sunflower seed butter:

1lb raw sunflower seeds ($1.99 trader joes)
Tbsp honey (optional)
Pinch of sea salt
Evoo (extra virgin olive oil)

Spread sunflower seeds on a lightly oiled baking sheet. Put i n preheated 375 oven for about 5-7 mins (turning occasionally ) until lightly toasted! Let cool for a couple mins (only to prevent burning your fingers!!) Put the seeds in the food processor. Pulse anywhere from 5-10 minutes until seeds start to get alittle oily & creamy. Add your honey, pinch of sea salt, and a tbsp of evoo. Pulse again until it starts to combine. Then, add 1 tbsp of evoo at a time while pulsing until you get a creamy consistency! This is where the patience part comes in ! πŸ™‚ I store mine in a mason jar (seen in picture) & it fills the whole thing! I leave it in the cabinet or on counter (doesn’t last long in my house!) If you notice it gets dry after a day or so you just may not have added enough oil. You can put it back in the processor & repeat last step πŸ™‚

Enjoy your creamy roasted honey deliciousness! Try not to eat it all with a spoon! πŸ™‚